Monday, July 5, 2010

Monday, 7/5/2010

Riveted on outboard aileron bracket


Riveted on inboard aileron bracket


Attached top skins for final riveting.


Sunday, July 4, 2010

Sunday 7/4/2010

The holes that were match drilled onto the main spar from the fuel tank had to be enlarged to a #19 size, then #40 holes drilled on either side of the main hole that match the dimensions of the plate nuts that will be installed in them.  Holes were dimpled and/or countersunk where it was not possible to dimple them and plate nuts were riveted to the spars.


Platenuts were installed on the leading edge rib strip.  These platenuts are use to attach the fuel tank to the leading edge rib.


The innermost platenuts have to be slightly ground off on the top side because of interference with the main spar web straps.


With the platenuts installed on the bottom of the main spar web for the fuel tanks, the wing skins are now ready to be riveted to the ribs and spar.  Total time today 8.5 hrs.

Saturday, July 3, 2010

Saturday 7/3/2010

Inserted and prosealed vent fitting to on first fuel tank rib. This fitting lets air into the tank as fuel is used to equalize pressure.


Other side of same rib showing the vent line attached to the AN fitting.


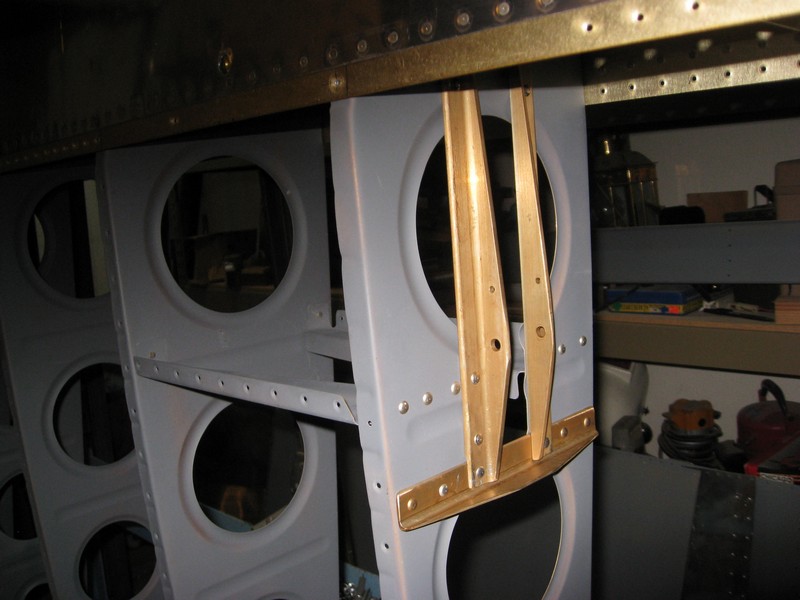
The other end of the vent line goes to the last rib and is held in place by an aluminum strip that is riveted to the fuel cap fitting.  Its the highest point in the tank so no fuel will get in the vent line.


Before the tank is closed up, its a good idea to bend the float bar to the correct position so the float will go to the top of the tank and also to the bottom of the tank   The float bar comes as a straight piece of metal.  You have to play with it to get it to fit the tank correctly.


Float on bottom on tank to simulate a "no fuel" condition.


Its also a good idea to put an ohmmeter on the lead of the fuel level sensor and make sure the resistance varies as the float moves from the bottom position to the top position.  These Stewart Warner senders are actually used commercial trucks (big rigs) and Vans adapted them to the RV series.

Fuel tank is ready to have back plate installed then to be pressure tested for leaks.

Sunday, June 27, 2010

Sunday 6/27/2010

Finished prosealing and riveting the 2 outside ribs to the fuel tank.


Alodyned the fuselage attach brackets and reinforcing ribs.


Prosealed and rivet the brackets to the fuel tank.


Left tank ribs all compete.

Saturday, June 26, 2010

Saturday 6/26/2010

Prosealed and riveted the three middle ribs into the left fuel tank.


Sunday, June 20, 2010

Sunday 6/20/2010

Prosealed and riveted the fuel cap to the fuel tank.


Prosealed and riveted the fuel drain to the fuel tank.

Saturday, June 19, 2010

Saturday 6/19/2010

Set up left fuel tank to rivet and proseal bottom stiffener angles.  The proseal keeps the tanks from leaking from around the rivets.


Finished prosealing and rivets bottom stiffeners


Thursday, June 17, 2010

Thursday 6/17/2010

Riveted on rear spar to wing ribs.

Sunday, June 13, 2010

Sunday 6/13/2010

Finished dimpling all main ribs and rear spar.  Installed angles to main ribs 1 through 7 and installed back onto the main spar for the last time.  Installed AN3 bolts and nuts to main ribs 1 through 7.  Pop riveted ribs to main spar with L4-3 pop rivets and riveted other ribs when you can get to both sides to buck.


Riveted aileron bellcrank support angles and cross braces to ribs.

Saturday, June 12, 2010

Saturday 6/12/2010

The picture shows a special Averys tool for putting a slight crease along the edge of an aluminum sheet.  This helps the sheet to lay flat after riveting it.


Leading edge clecoed together and ready to rivet.


But first, you need to install all of the main ribs and make sure all bolts and nuts line up in the appropriate holes.  If there is a problem, you dont want to have to drill out a bunch of rivets to fix it.

Orange goop on nut shows its been tightened to the proper torque.


Leading edge riveting completed.  time 7.5 hrs

Sunday, June 6, 2010

Sunday 6/6/2010

110 degree heat with direct sun in the afternoon on the southwest facing hanger means unbearable temps inside the hanger.  Limited electrical to each hanger means you can't run an evap cooler and a compressor at the same time so its time to move the work back home.


Jig resetup in garage. Continued with cutting the hole in the main spar for the wing tie-down ring.


Saturday, June 5, 2010

6/5/2010

Did some more priming and finished riveting leading edge of right wing.  5 hrs.

Saturday, May 29, 2010

05/30/2010

Finished deburring and dimpling all wing skins for right wing.  7 hrs.

Sunday, May 16, 2010

05/16/2010

All right wing main ribs, leading edge ribs, rear spar and other pieces epoxy coated and ready for final assembly in wing jig. 11 hrs

Saturday, May 15, 2010

05/15/2010

All ribs acid etched and dipped in the alodine solution. Dipping works much better than spraying or brushing the alodine solution on. I found 20 seconds of dipping was ideal versus the recommended 1 to 3 minutes of recommended time when you brush the solution on. 5 hrs

5/2/2010

Wing ribs ready for acid etching, alodining and epoxy priming to make them moisture proof.

Sunday, April 25, 2010

04/24/2010

Added small covers for the outside bottoms of the outside ribs on the tank. There is a big gap there where the two rib flanges are cut off before they were bent over.